Оглавление
Как управлять компьютером вместо мышки джойстиком — 3 варианта схем контроллеров на базе Arduino и стандартного модуля джойстика. И бонусный, четвертый, на микроконтроллере PIC.
Первый вариант схемы джойстика
Используя библиотеку Mouse, можно управлять курсором на экране компьютера с помощью Arduino Leonardo, Micro или Due. В этом примере используется кнопка для включения и выключения управления мышью с помощью джойстика.
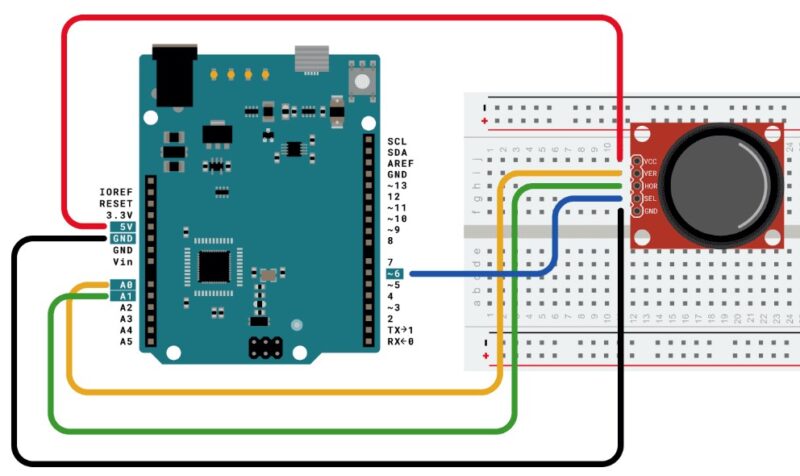
Движение курсора от Arduino всегда относительно. Поэтому каждый раз, когда считывается аналоговый вход, положение курсора обновляется относительно его текущего положения.
Два аналоговых входа в диапазоне от 0 до 1023 преобразуются в диапазоны от -12 до 12. В схеме предполагается, что значения покоя джойстика находятся примерно в середине диапазона, но изменяются в пределах порогового значения.
Кнопка позволяет включать и выключать управление мышью. В качестве опции можете подключить светодиод состояния к контакту 5, который загорается, когда Arduino управляет мышью. Вторая кнопка может быть подключена с другим резистором 10 кОм pulldown (к GND) к D3, чтобы действовать как левый клик мышки.

Подключите плату Leonardo к компьютеру с помощью кабеля micro-USB. Кнопка подключена к контакту 6. Если используете деталь вроде джойстика, изображенного ниже, то может не понадобиться резистор подтягивания вниз. Ось x на джойстике подключена к аналоговому входу 0, ось y — к аналоговому входу 1.
Код прошивки
#include «Mouse.h»
// set pin numbers for switch, joystick axes, and LED:
const int switchPin = 2; // switch to turn on and off mouse control
const int mouseButton = 3; // input pin for the mouse pushButton
const int xAxis = A0; // joystick X axis
const int yAxis = A1; // joystick Y axis
const int ledPin = 5; // Mouse control LED// parameters for reading the joystick:
int range = 12; // output range of X or Y movement
int responseDelay = 5; // response delay of the mouse, in ms
int threshold = range / 4; // resting threshold
int center = range / 2; // resting position valuebool mouseIsActive = false; // whether or not to control the mouse
int lastSwitchState = LOW; // previous switch statevoid setup() {
pinMode(switchPin, INPUT); // the switch pin
pinMode(ledPin, OUTPUT); // the LED pin
// take control of the mouse:
Mouse.begin();
}void loop() {
// read the switch:
int switchState = digitalRead(switchPin);
// if it’s changed and it’s high, toggle the mouse state:
if (switchState != lastSwitchState) {
if (switchState == HIGH) {
mouseIsActive = !mouseIsActive;
// turn on LED to indicate mouse state:
digitalWrite(ledPin, mouseIsActive);
}
}
// save switch state for next comparison:
lastSwitchState = switchState;// read and scale the two axes:
int xReading = readAxis(A0);
int yReading = readAxis(A1);// if the mouse control state is active, move the mouse:
if (mouseIsActive) {
Mouse.move(xReading, yReading, 0);
}// read the mouse button and click or not click:
// if the mouse button is pressed:
if (digitalRead(mouseButton) == HIGH) {
// if the mouse is not pressed, press it:
if (!Mouse.isPressed(MOUSE_LEFT)) {
Mouse.press(MOUSE_LEFT);
}
}
// else the mouse button is not pressed:
else {
// if the mouse is pressed, release it:
if (Mouse.isPressed(MOUSE_LEFT)) {
Mouse.release(MOUSE_LEFT);
}
}delay(responseDelay);
}/*
reads an axis (0 or 1 for x or y) and scales the analog input range to a range
from 0 to <range>
*/int readAxis(int thisAxis) {
// read the analog input:
int reading = analogRead(thisAxis);// map the reading from the analog input range to the output range:
reading = map(reading, 0, 1023, 0, range);// if the output reading is outside from the rest position threshold, use it:
int distance = reading — center;if (abs(distance) < threshold) {
distance = 0;
}// return the distance for this axis:
return distance;
}
Второй вариант схемы джойстика
Если имеете Arduino Uno, то можно найти интересное применение для модуля джойстика PS2. Вот как легко превратить Arduino в мышь с джойстиком для ПК.
Обратите внимание, что используя библиотеку «mouse», оно заработает только с Arduino Leonard и Micro, но не с вездесущим Uno. Тут придется делать иначе.
Для этого проекта потребуется:
- Ардуино Уно.
- 5 проводов типа «папа-папа».
- 5 проводов типа «мама-мама» (для подключения к модулю джойстика и для увеличения длины удлинителя джойстика).
- Джойстик (использовался модуль джойстика SainSmart PS2).
Схему подключения Uno можно увидеть на фото.

Подключите 5 проводов типа «мама-мама» к контактам модуля джойстика. Теперь подключите 5 проводов типа «папа-папа» к концам проводов типа «мама» и подключите их к Arduino следующим образом:
- Земля на джойстике к Arduino Gnd
- +5В на джойстике к Arduino 5В
- UPx на джойстике к A0 на Arduino
- UPy на джойстике к A1
- Контакт SW (цифровой переключатель щелчка) к цифровому контакту 7 на Arduino
Далее подключите Uno к ПК и загрузите код джойстика, представленный ниже:
int pushPin = 7; // potentiometer wiper (middle terminal) connected to analog pin 3int xPin = 0;int yPin = 1;int xMove = 0;int yMove = 0;// outside leads to ground and +5Vint valPush = HIGH; // variable to store the value readint valX = 0;int valY = 0;void setup(){pinMode(pushPin,INPUT);Serial.begin(9600); // setup serialdigitalWrite(pushPin,HIGH);}void loop(){valX = analogRead(xPin); // read the x input pinvalY = analogRead(yPin); // read the y input pinvalPush = digitalRead(pushPin); // read the push button input pinSerial.println(String(valX) + » » + String(valY) + » » + valPush); //output to Java program}
Теперь, когда Uno настроен, нужно подключить его к программе Java, которая способна принимать последовательные выходные значения Uno с помощью специальной библиотеки RxTx и перемещать мышь с помощью коллекции библиотек JNA. Обратите внимание, что единственная часть кода, которую изменили из примера RxTx, — это добавление метода, который перемещает мышь способом, откалиброванным для данного джойстика.

Тут использовали BlueJ в качестве IDE, но какую бы Java IDE ни применяли, установите библиотеки RxTx и JNA для этого проекта, который назван «Mouse». После этого создайте проект и включите в него этот код:
import java.awt.*;
import java.awt.event.InputEvent;
import java.io.BufferedReader;
import java.io.InputStreamReader;
import java.io.OutputStream;
import gnu.io.CommPortIdentifier;
import gnu.io.SerialPort;
import gnu.io.SerialPortEvent;
import gnu.io.SerialPortEventListener;
import java.util.Enumeration;public class Mouse implements SerialPortEventListener {
SerialPort serialPort;
/** The port we’re normally going to use. */
private static final String PORT_NAMES[] = {
«/dev/tty.usbserial-A9007UX1», // Mac OS X
«/dev/ttyACM0», // Raspberry Pi
«/dev/ttyUSB0», // Linux
«COM4», // Windows**********(I changed)
};
/**
* A BufferedReader which will be fed by a InputStreamReader
* converting the bytes into characters
* making the displayed results codepage independent
*/
private BufferedReader input;
/** The output stream to the port */
private OutputStream output;
/** Milliseconds to block while waiting for port open */
private static final int TIME_OUT = 2000;
/** Default bits per second for COM port. */
private static final int DATA_RATE = 9600;int buttonOld = 1;
public void initialize() {
// the next line is for Raspberry Pi and
// gets us into the while loop and was suggested here was suggested http://www.raspberrypi.org/phpBB3/viewtopic.php?f…
//System.setProperty(«gnu.io.rxtx.SerialPorts», «/dev/ttyACM0»); I got rid of this
CommPortIdentifier portId = null;
Enumeration portEnum = CommPortIdentifier.getPortIdentifiers();
//First, Find an instance of serial port as set in PORT_NAMES.
while (portEnum.hasMoreElements()) {
CommPortIdentifier currPortId = (CommPortIdentifier) portEnum.nextElement();
for (String portName : PORT_NAMES) {
if (currPortId.getName().equals(portName)) {
portId = currPortId;
break;
}
}
}
if (portId == null) {
System.out.println(«Could not find COM port.»);
return;
}
try {
// open serial port, and use class name for the appName.
serialPort = (SerialPort) portId.open(this.getClass().getName(),
TIME_OUT);
// set port parameters
serialPort.setSerialPortParams(DATA_RATE,
SerialPort.DATABITS_8,
SerialPort.STOPBITS_1,
SerialPort.PARITY_NONE);
// open the streams
input = new BufferedReader(new InputStreamReader(serialPort.getInputStream()));
output = serialPort.getOutputStream();
// add event listeners
serialPort.addEventListener(this);
serialPort.notifyOnDataAvailable(true);
} catch (Exception e) {
System.err.println(e.toString());
}
}
/**
* This should be called when you stop using the port.
* This will prevent port locking on platforms like Linux.
*/
public synchronized void close() {
if (serialPort != null) {
serialPort.removeEventListener();
serialPort.close();
}
}
/**
* Handle an event on the serial port. Read the data and print it. In this case, it calls the mouseMove method.
*/
public synchronized void serialEvent(SerialPortEvent oEvent) {
if (oEvent.getEventType() == SerialPortEvent.DATA_AVAILABLE) {
try {
String inputLine=input.readLine();
mouseMove(inputLine);
System.out.println(«********************»);
//System.out.println(inputLine);
} catch (Exception e) {
System.err.println(e.toString());
}
}
// Ignore all the other eventTypes, but you should consider the other ones.
}
public static void main(String[] args) throws Exception {
Mouse main = new Mouse();
main.initialize();
Thread t=new Thread() {
public void run() {
//the following line will keep this app alive for 1000 seconds,
//waiting for events to occur and responding to them (printing incoming messages to console).
try {Thread.sleep(1000000);} catch (InterruptedException ie) {}
}
};
t.start();
System.out.println(«Started»);
}// My method mouseMove, takes in a string containing the three data points and operates the mouse in turn
public void mouseMove(String data) throws AWTException
{
int index1 = data.indexOf(» «, 0);
int index2 = data.indexOf(» «, index1+1);
int yCord = Integer.valueOf(data.substring(0, index1));
int xCord = Integer.valueOf(data.substring(index1 + 1 , index2));
int button = Integer.valueOf(data.substring(index2 + 1));
Robot robot = new Robot();int mouseY = MouseInfo.getPointerInfo().getLocation().y;
int mouseX = MouseInfo.getPointerInfo().getLocation().x;if (button == 0)
{
if (buttonOld == 1)
{
robot.mousePress(InputEvent.BUTTON1_DOWN_MASK);
robot.delay(10);
}
}
else
{
if (buttonOld == 0)
robot.mouseRelease(InputEvent.BUTTON1_DOWN_MASK);
}if (Math.abs(xCord — 500) > 5)
mouseX = mouseX + (int)((500 — xCord) * 0.02);
if (Math.abs(yCord — 500) > 5)
mouseY = mouseY — (int)((500 — yCord) * 0.02);robot.mouseMove(mouseX, mouseY);
buttonOld = button;
System.out.println(xCord + «:» + yCord + «:» + button + «:» + mouseX + «:» + mouseY);
return;
}
}
Заставить программу Java работать может быть сложно. Вот несколько советов, если вы застряли на этом этапе:
Измените строку «Com4» в PORT_NAMES[] на порт, к которому подключен ваш Arduino Uno. (изменили на Com4 с Com3 по умолчанию в Java).
Закомментируйте строку, относящуюся к Raspberry Pi (если скопировали эту программу, тут уже сделано).
Нажмите «Перестроить пакет» или эквивалент в вашей IDE.
Сбросьте виртуальную машину Java в вашей IDE. Возможно, даже сбросьте программу перед первым использованием мыши.
Конечно самым простым решением будет использовать Arduino Leonard или Mini, которые могут функционировать как системное устройство для ввода с помощью мыши, но показалось интересным заставить именно Uno функционировать как мышь, — используя знания Java.
P.S. На джойстике есть одна кнопка, которую зарезервировали для левого клика.
Третий вариант схемы джойстика

Тут будем делать аналог мышки с управлением джойстиком, используя Arduino Uno и модуль джойстика. Для работы понадобится:
- Arduino Uno
- 5 перемычек
- Джойстик
- Arduino-IDE среда разработки
- Python
Загрузите Python с сайта www.python.org/downloads. Затем скопируйте местоположение файла, указанное в вашем варианте. Откройте командную строку и введите следующее:
- cd <вставьте путь к файлу Python, который ранее скопировали из своих файлов, т.е. местоположение файла>
- py –m pip install upgrade pip
- py –m pip install mouse
- py -m pip install pyserial
Соберите схему, используя Arduino и джойстик.

Загрузка скетча Arduino
//The program that you can copy onto the Arduino IDE is-
void setup()
{
Serial.begin(9600);
pinMode(9,INPUT);
digitalWrite(9,HIGH);}
int prev_state=0;
void loop() {
int z=0,xpos=0,ypos=0;
int x=analogRead(A0);
int y=analogRead(A1);
int sensitivity=10;
if(x>=550)
xpos=map(x,550,1023,0,sensitivity);
if(x<=450)
xpos=map(x,450,0,0,-sensitivity);
if(y>=550)
ypos=map(y,550,1023,0,sensitivity);
if(y<=450)
ypos=map(y,450,0,0,-sensitivity);
int curr_state=digitalRead(9);
if(curr_state==1 && prev_state==0)
z=1;
else
z=0;
if(xpos!=0 or ypos!=0 or z==1)
{
Serial.print(xpos);
Serial.print(«:»);
Serial.print(ypos);
Serial.print(«:»);
Serial.println(z);
}
prev_state=curr_state;
delay(10);
}
Изменение Com-порта в программе Python. Вставьте эту программу в Блокнот
import mouse, sys
import time
import serialmouse.FAILSAFE=False
ArduinoSerial=serial.Serial(‘com3’,9600)
time.sleep(1)while 1:
data=str(ArduinoSerial.readline().decode(‘ascii’))
(x,y,z)=data.split(«:»)
(X,Y)=mouse.get_position()
(x,y)=(int(x),int(y))
mouse.move(X+x,Y-y)
if ‘1’ in z:
mouse.click(button=»left»)
Измените часть com3 программы на конкретный порт, который применим к вам. Сохраните этот файл как Python.py в Блокноте.

Откройте файл Python в программном обеспечении Python, которое вы только что сохранили, т.е. Python.py.

Нажмите на вкладку «Выполнить» и нажмите «Запустить модуль», чтобы запустить программу на плате Arduino. После того, как выполните все эти шаги, сможете использовать джойстик для перемещения указателя мыши на ПК, а также он будет выполнять функцию щелчка.
Видео работы устройства
Джойстик, по сути, состоит из двух потенциометров, выровненных в направлении x и y. Arduino Uno считывает аналоговые (тут зафиксировали выводы x и y в аналоговых выводах 0 и 1) значения с джойстика в диапазоне от 0 до 1023. Таким образом, когда джойстик находится в своем положении по умолчанию, то есть в центре, аналоговое значение также становится близким к 510 — 511 (между 0 и 1023).


